
flickr photo shared by mrkrndvs under a Creative Commons ( BY-SA ) license
Disclosure: This post is a part of my work with the Hapara Certified Educator course. The final task was to develop an implementation plan, which incorporated goals for supporting others and transforming education. Inspired by Ben Williamson’s work on Class Dojo, I have tried to provide a thorough introduction to what Hapara offers, as well as some ideas moving forward.
Hapara is an instructional management system designed to support educators who wish to organize, manage and monitor learning with the help of G Suite. Differing from Learning Management Systems, Hapara’s goal is to improve learning by improving instruction. The intent is to provide the tools to scale teacher-student relationships, not replace that role. Based on the work of John Hattie, Hapara was initially designed to support things such as:
- Student agency
- Constructivist dialogue
- Differentiation
- Formative assessment
The reality is that Hapara was developed to free up teachers to spend time on the more important elements associated with learning.
Hapara works through the use of application programming interfaces (APIs) provided by Google as a means of transforming the way in which G Suite works. Much of the web is built around APIs. They offer developers a way of incorporating different features, without recreating the wheel. For example, rather than create your own mapping program, Google provides the means of embedding Google Maps. It is also for this reason that there are similarities with other products like GoGuardian, because they are both built using the same building blocks provided by Google. For a richer discussion of APIs, I recommend reading Ben Werdmuller’s post or checking out Kin Lane’s work.
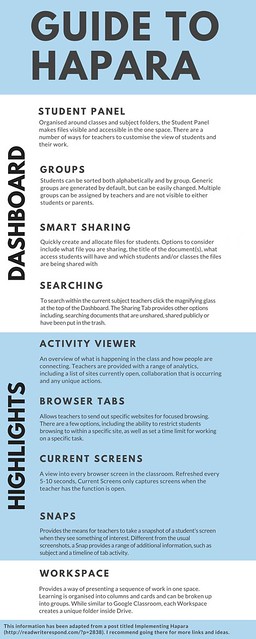
DASHBOARD

Classes and Subjects
The core product that makes up the Hapara suite is the Dashboard. This application provides something of a bird’s eye view over the G Suite ecosystem. Organised around classes and subject folders, it makes files visible and accessible by bringing them together on one screen.
Classes and subjects are managed at an administrative level. They are usually derived from the school timetable. However, it is easy enough for a school to make their own changes, such as creating an elective subject or adding multiple teachers to a subject. Within Manage Classes section there is the option of personalising the name and colour associated with classes you can personalise the names and colours attached to your classes. You just hover the cursor to see the original title. In regards to ownership, you can quickly add teachers in the Class Info section.
Student Panels
In regards to how the Student Panels are presented, there are a number of ways that information can be adjusted. Whether it be choosing how many items are shown in each panel or holding your cursor over a file to bring up metadata, such as author, updates, views and access rights. The panels can also be sorted both alphabetically and by group. Generic groups are generated by default, but just as with classes you can easily change the predefined names. You assign students to groups in options setting attached to each Student Panel. It is important to note that these groups are not visible to either students or parents. When you click on the file within Student Panel you are taken to the document as an editor. This allows you to quickly provide feedback by adding a comment. You can also email students via the options in the panel.
Sharing Content
For distributing content, Smart Share allows you to quickly send out files. Although sharing is relatively simple, there are some things to consider, such as:
- What file you are sharing (it may simply be a blank document)
- The title of the document
- What access students will have
- Which students and/or classes you are sharing with
Although you can reshare files and delete the previous version, you are unable to make changes to sharing options of files once they are sent. Once files have been allocated, students can organise their Google Drive into sub-folders. By opening up the options menu for each student, you are able to click a link to view their folder within Google Drive.
Searching for Information
In addition to the Student Panels, there are a number of ways to find information that may not be visible. You can search within the subject that you are currently in by simply clicking on the magnifying glass at the top of the screen. This allows you to filter by information within the title or content in the actual text of the document.
If the file you are looking for exists outside of the subject folder, you can use the Sharing Tab. These searches can be organised around various access levels. There are five categories which you can click on:
- Unshared: Anything in the student drive that has not been shared with anyone else.
- Public: Files created in a student account that people outside of the domain can access.
- External: Files created by a non-domain account and then shared with an account within the domain.
- All Docs: list of every doc the student has in their Drive.
- Docs Trash: see all documents in a student’s trash.
These various options provide the ability to search your whole domain and appreciate who might be shared with what, rather than having to use something like Who Has Access. It also provides the means for locating work that a student may have misplaced within their Drive.
Beyond the Dashboard and Sharing tabs, Hapara also provides the means of monitoring student Gmail accounts. This functionality allows you to search within the inbox, sent and trash folders. What is interesting is that when you open up a message, students are not notified and it will remain unread. There are a number of ways of adjusting the settings associated with the Gmail Tab within the Admin Console. This includes the ability to filter who is able to access the option, as well as sort the types of emails shown.
In addition to Gmail, you are also able to explore Blogger blogs and Sites. These show up for each class next to the various subject tabs.
Highlights
Highlights is described as a ‘screen visibility and engagement tool’. Separate from the core dashboard functionalities, it provides insight not only into folders and files, but what students are doing on the web and how they are collaborating with others. It is similar in some ways to applications, such as Lanschool and GoGuardian. This added functionality is dependent on students signing into Google Chrome with their school’s G Suite account. It also requires the installation of an extension. There are four elements to Highlights:
- Activity Viewer: provides an overview of what is currently happening in the class and how people are connecting. It provides analytics about different forms of browser usage. This includes, a list of sites currently open, collaboration that is occurring and any unique actions. Results are divided between current and previous usage.
- Browser Tabs: Similar to the ability to share out files with SmartShare, Browser Tabs allows you to send out specific websites for focused browsing. There are quite a few options associated with this, including the ability to restrict students browsing to within a specific site, as well as set a time limit for working on a specific task. Some possibilities associated with this include: brainstorming around a particular provocation, guide groups or individual students to a specific video or task, provide a set amount of time for students to complete a test using their computer and avoid confusing URLs by directing students to a specific website. Another functionality associated with Browser Tabs is the ability to send messages to students. Although you could do this via email within Dashboard, sending a message within Highlights means that it comes up directly on the screen.
- Current Screens: This provides a view into every browser screen in the classroom. Unlike applications such as Lanschool, the insight provided is not live, rather it is a screenshot refreshed every 5-10 seconds. It also only does this when you have the Current Screens function open. This process can create quite a demand on the bandwidth used. However, you can adjust the bandwidth settings within the Admin Console.
- Snap: Whereas the screenshots shown via Current Screens are continually refreshed, Snap allows you to take a snapshot of student work when you see something interesting. Maybe it is something that you want to document or something to come back to at a later point. These are different from usual screenshots as they provide a range of additional information. This data includes student, subject, timeline of tab activity, who took the snap and when. These captured images can be saved by emailing to yourself or used as a means of sending feedback to students. They are automatically deleted from the system after seven days.
Each of the parts is designed to support further personalisation of the learning process and capture richer evidence associated with formative assessment to support future instruction. However, this is dependent on students logging into Chrome. To get around the various constraints, students can easily use incognito mode or a different browser. While there are also measures to prevent the invasion into personal space and time, such as time constraints and IP restrictions. For a full guide to Highlights, click here.
Workspace
Workspace is a relatively new addition to Hapara. Separate to Dashboard, Workspace provides an efficient way of presenting a unit of work in one space. It involves the development of learning sequences using a series of cards. Similar to Google Classroom, each workspace creates a folder inside your drive. This though is separate to the Dashboard file structure, but viewable through the Sharing Tab. One of the biggest challenges is having a clear idea about the learning involved.
Planning For Learning
There are many different models that can be used to plan for learning:
- Inquiry-Based Learning
- Project-Based Learning
- Problem-Based Learning
- Madeline Hunter Model for Mastery Learning
- Challenge-Based Learning
Whatever the framework, they each provide a series of questions to consider. A popular model in many schools is Understanding by Design. One of the key features of UbD is that it is backwards planned. This involves identifying desired results, including various transfer goals. Understandings and essential questions are then listed. Once this is done, assessment evidence is determined. Associated with this, it is important to call out the various standards being addressed within the unit of work. This includes considering learning areas, interdisciplinary and social capabilities.
Organising your Workspace
Once you have your learning sequence planned out, you need to consider the structure of your workspace. There are a number of things to consider, including:
- Number of Columns – There are four by default, but you only have to have Columns Two and Three.
- Titles for Columns – You can easily change the default titles to make them what you like.
- Layout – Information is presented in the form of cards
- Styles – You can add HTML code to change the colour, size and format of the text.
- Groups – This allows you to adjust who sees what, although it needs to be noted these groups are different from those in Dashboard.
Although you are able to adjust the order of cards within a column, it can be useful to use something like a Google Doc to develop a rough draft of your Workspace.
Supporting Learning
One of the best things about Workspace is the potential to incorporate a range of different activities and applications. Looking at the activities and information that you have provided and consider if there are anything that you could add to take learning further? Below are some options of things to consider:
It can be useful to review your initial plan and add in ideas for different activities and applications to further develop the learning opportunities.
Differentiation
One of the things that Hapara prides itself on is the ability to quickly and easily differentiate learning. This focus incorporates what is taught, including content, process, product and environment, changes to how something is taught, as well as why something is taught in the first place. See Carol Ann Tomlinson’s book The Differentiated Classroom: Responding to the Needs of All Learners for further explanations and elaborations associated with differentiation.
One of the powerful features of Workspace is the ability to differentiate learning in a number of ways. This includes:
- Creation of groups
- Gradual release of cards
- Provision for individual tasks, as well as group work
- Assigning different content to different students
- Means for students to determine their own learning
- Choice over what type of learning product is created
This is only a start and every context provides its own possibilities and potentials.
Sharing Workspaces
One benefits Workspace which makes it different to something like Google Classroom is the potential to easily share them others. Once made public, they are added to the global library. Searching the library can actually be differentiated between titles, groups and cards. You are also provided with a link to the actual Workspace, which can then be shared out on social media. (See for example my workspace on how to make a great workspace.) If the Workspace has been published to a class prior to sharing then it is taken back to its initial format, removing student content and groupings. This offers the possibility to easily remixing a unit from a prior year or sharing the one workspace with a number of teachers in a year level to make their own modifications.
“Implementing Hapara” by mrkrndvs is licensed under CC BY-SA
Implementing Hapara
Moving forward, my goal in my current position is to support schools with the implementation of G Suite and the transformation of education. To me, Hapara with all of its different facets makes much of this possible. Working with so many different contexts, it is far too simplistic to use something like SAMR model in order to identify points of change. Although this may be useful in starting a conversation, I think that something like the Modern Learning Canvas provides a more nuanced approach:

This helps to frame the conversation about education technology within a richer discussion of learning and teaching. Technology has the potential to dramatically change what occurs in the classroom, but it also has the potential to maintain the status quo. It is only by developing a plan and purpose for each context that we will truly move forward.
If you enjoy what you read here, feel free to sign up for my monthly newsletter to catch up on all things learning, edtech and storytelling.
Implementing Hapara by Aaron Davis is licensed under a Creative Commons Attribution-ShareAlike 4.0 International License.
Incredibly thorough and helpful, Aaron. And yes, I agree. SAMR is just a start; thinking outside of and beyond these simple models will get us to the places our current tools are designed for.
Thank you Evyan for the comment. I think that it is so important to link any tool to a wider conversation about the actual purpose of education. This though is sometimes the greatest challenge.
Thank you. I will take the time to find out more. Fantastic event (Auckland Summit) to be part of.
Mona Wang and Geenie Gebhart discuss the increase of surveillance technology in schools. This is often used in the name of safety, however the authors suggest education is being “made a testbed for mass surveillance with no evidence, and no way to opt out.”
Ever since I have been in education, there have been applications to support surveillance. I think what has changed is their breadth and reach. Where the applications providing ability to view screens was restricted to the computer lab, the rise of portable devices and cloud computing has made such surveillance more doable.
Although focusing on data, Ben Williamson provides his own take on the current climate within education:
https://platform.twitter.com/widgets.js