flickr photo shared by mrkrndvs under a Creative Commons ( BY-SA ) license

It is coming up to a year now since I made the move from Blogger to WordPress via Reclaim Hosting. I have been asked by many about why I changed, what was involved and what my experiences have been. I thought that now would be as good a time as ever to take stock and reflect on my experience so far.


I came upon Reclaim Hosting via the generous sharing as a part of Connected Courses.

Although I received some warnings in regards to the risks involved in setting up my own space:


Thankfully, I am still hear and blogging away. The question though that I keep getting asked is what have been my experiences.

Here then is a list of my thoughts and reflections:

CHANGING SPACES

The first concern that I often get asked is transferring content from one space to another. The reality is it took about five minutes. The only issue I had was with tags and categories. However, tags can be selectively converted to categories using the tag to category converter.

MORE THAN MONEY

There is really no comparison in regards to cost between paying for something like wordpress.com and Reclaim. To be honest, if you were choosing the cheaper option, you would probably go with Reclaim. Not only is it affordable, but also includes free domain registration. One thing I had to consider is that the space is limited (2gb). However, this is the same with most spaces. The answer is to learn to store content elsewhere – such as Amazon, Scribd, Youtube and Flickr – and embedding it.

CHOOSING A THEME

One of the complaints that I have heard people complain about is the lack of flexibility or the requirement to pay for something that you are not even sure about. I have found that there are so many more options out there when running WordPress.org, most of which are unavailable within wordpress.com. The hardest thing is then finding the right one. Inspired by a post from Alan Levine, I went with Moesia for Readwriterespond, while in a site a created DigiCon15 I used Asteria Lite.

IMPROVING MY WORKFLOW

It is really interesting working with both Edublogs at school and my own installation of WordPress here. Although in many respects they are both the same, I have been forced to rethink many of the solutions that I have developed for my own blog. Some of the plugins that I have come to depend upon within wordpress.org include:

  • Creative Commons Configurator: This allows you to set the Creative Commons license for each of your posts.
  • Automatic Post Thumbnail: One of the catches with many themes is that they depend on a featured image. Using Flickr and Alan Levine’s Attribution Helper for my images, the plugin makes the first image used ‘featured’.
  • Jetpack: This provides a means of measuring statistics and connecting with the wider WordPress family. I must admit, I have stopped measuring the statistics , but still find it useful when connecting. Plus, Alan Levine shared that removing Jetpack wrecked his theme, so warned against it.
  • WordPress Backup to Dropbox: I must admit, I could do a better job at backing up, so a plugin that does it for me is priceless.

WORLD CLASS SUPPORT

The thing that I will say has been the best to moving to Reclaim is the amount of support. Whether it be touching base to check how I was settling or promptly responding to questions, I am always astounded at how quickly I get responses. Jim Groom recently reflected on the level that they set. What I love the most is the feeling that no question is too small and that, as Jim Groom explains, it all comes back to helping others make sense of the web.

LEAD LEARNER

All the talk at the moment seems to be about computational thinking. For some this is just another word for coding, but to me it is about developing an awareness about how things work. Not just knowing that the internet is built with code, but what this actually means. I find the best way to develop awareness is through the act of tinkering and creation. Whether it is exploring Known or exploring the limits of the platform, owning your own space is a great learning experience, what Jim Groom describes as a return of teaching and learning to the scale of the individual.

HURDLES REMOVED

Although other spaces can be easy to create, using templates and so forth, they soon become complex though when trying to co-claim that content. Not only does the team at Reclaim support you with whatever content you are bringing across, but they are just as supportive in regards to taking it out again.

SUB-DOMAINS

One of the other benefits I have found to owning my own domain is the opportunity to create sub-domains. This can include creating different sites or redirects. Alice Keeler provides a great explanation of this.


I am sure that there are things that I have missed, but this is at least a start. What about you? Have you made the move to own your own space on the web? What have been your challenges? Experience? Benefits? As always, comments welcome.

For more on Reclaim, I recommend checking out Tim Owens introduction.


If you enjoy what you read here, feel free to sign up for my monthly newsletter to catch up on all things learning, edtech and storytelling.


flickr photo shared by mrkrndvs under a Creative Commons ( BY-NC-SA ) license

Session Description

For some Google Drawings is just a dumbed down version of Paint not allowing for much. However, the collaborative and constrained nature opens up so many different possibilities. This session will explore some of the different possibilities associated with Google Drawings from making collaborative brainstorms to developing complex flowcharts to creating engaging graphics. It will be jam packed with practical samples and examples. Aaron hopes to spur on new ideas and start the conversation about why you should start using Google Drawings more today.

Often Google Drawings is overlooked as being a simple graphic program, offering not much more functionality than Microsoft Paint. You are able to add images, text, shapes, links and lines, while in regards to images, you can crop, re-colour and adjust the basic image settings. That means no touch-ups, no effects, no textures. However, what makes this more than Paint is the collaborative nature. The ability to easily share opens up many possibilities, whether it be working on a project, creating a brainstorm or just sharing a file to be remixed. In some respect the perceived limitations of Google Drawings are often its strengths.

For example, there are some out there who use Drawings to create eye catching visuals. Bypassing the many applications, instead using Google Drawings to create infographics. Tony Vincent has made a fantastic video documenting how he did this to create an infographic associated with Periscope.

Features of Google Drawings

Google Drawings has many features, this is a list of some of them:

  • Resize the canvas, either by manually dragging the edge at the bottom or in Page Setup within File to make something specific.
  • Insert a range of objects, including text, images, shapes, word art and tables
  • Draw lines
  • Format shapes: This includes colour fill, as well as width and style of the border.
  • Group, order and arrange objects
  • Access different fonts from the Google Fonts Library
  • Edit images, including cropping to a shape, adding borders, inserting links and adjusting the colour settings.
  • Red and blue guidelines helps you to organise the different objects both in regards to alignment and size.
  • Share shapes with other applications using web clipboard in edit
  • Publish to the web, not only is this useful in its own accord, but it also provides the means to embed within a website.

For a thorough step-by-step introduction to Google Drawings, I recommend looking at Kasey Bell’s Cheat Sheet.

Tips using Google Drawings

Here are some tips to help working with Google Drawings:

  • Holding SHIFT will allow you to make finer adjustments, constrain movement to the nearest axises and maintain relative proportions when resizing.
  • Holding down Ctrl allows you to choose multiple objects, when clicking and dragging off an object it allows you to create a duplicate, while when adjusting the node of an object allows you to maintain the dimensions
  • Holding ALT temporarily disable ‘Snap to Grid’
  • Canvases are transparent, but will turn to white if you download them as a JPEG. If you want to change the background colour, right click on the canvas to get the different options.
  • Clear formatting can be useful when copying in text to clear the formatting
  • Replace image, not only will this keep the same dimensions as the previous image, but it will crop it to fit
  • Use the workspace around the canvas to store elements and instructions offstage.
  • For my tips, here is an extensive list of shortcuts

Ideas for using Google Drawings

There are many ways of using Google Drawings. It like to break it down into six categories:

Graphic Organisers

Drawings provides the ability to create and collaboratively complete graphic organisers. This can be anything from a Venn diagram, to seating plan to a sporting line-up. Eric Curts has created a great collection of templates to easily copy into your Drive.

Visualising Thinking

By using shapes, lines and texts Drawings allows you to create brainstorms, concept maps, timelines, flowcharts and infographics with ease. What is good is that you can easily build upon past designs.

Digital Manipulatives

Whether it be working with a fraction wall,, making messages with magnetic poetry, moving the hands of a clock to tell the time, or organising different shapes into categories, Drawings allows you to create resources that allow students to engage with.

Web Clipboard

Using the line tool, create arrows to the different parts and then add text to describe them. This can be particularly useful when creating diagrams or annotating images for tutorials for Docs, Slides and Sheets. Using web clipboard, images can be created using Drawings then transferred to other programs. The benefit is that unlike copying a finished image, you are able to continue to make changes and adjustments. See Andy Hair’s course diagram for an example.

Desktop Publishing

Building on the idea of Web Clipboard, you can use the full suite of applications to create merges for any situation. Sylvia Duckworth provides a tutorial for how to quickly and easily create personalised cards.

Avatars and Images

Through the use of shapes and lines, you are actually able to make a wide range of images. From cartoon characters and vector portraits, to visual quotes, memes and motivational posters. What is great is the ease in which you can just remix an old design.

Activities

Wanting to explore Google Drawings, have a go at the following activities:

  • Create a Visual Quote: Use the ingredients provided to create your own visual quote.
  • Design a Flowchart: Choose one of the ideas provided and create a flowchart describing how you could use it in your own classroom.
  • Make your own Avatar. Using James Peterson’s tutorial as a guide, have a go at creating a new avatar by taking a picture and turning it into a vector image.

General Resources:


If you enjoy what you read here, feel free to sign up for my monthly newsletter to catch up on all things learning, edtech and storytelling.


flickr photo shared by mrkrndvs under a Creative Commons ( BY-SA ) license

GAFE Summit Session Description

For some Google Slides is just a dumbed down version of PowerPoint. However, the collaborative nature opens up so many different possibilities. This session will explore intricacies associated with Slides from sharing presentations, to changing themes, to importing media, to creating ebooks. It will be jam packed with practical samples and examples. Aaron hopes to spur on new ideas and start the conversation about why you should start using Google Slides more today.

Google Slides 101 from Aaron Davis

IDEAS:

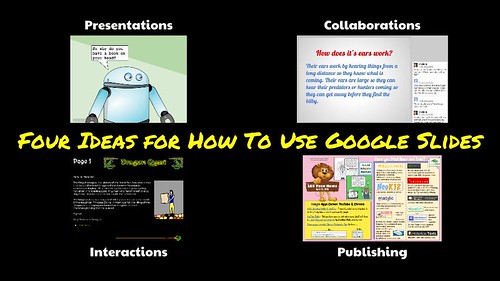
There are many ways of using Google Slides. It like to break it down into four sections:

  • Presentations. Just like PowerPoint, Slides provides an easy way to use the templates provides to present information. However, going a step further, using the shapes, animations and image manipulation, Slides allows you to create a Comic Strip. See this example from Eric Curts to make more sense.
  • Collaboration. What makes Google Slides stand apart from other platforms is the ability to collaborate. At a simple level, this involves develop ideas together. For example, Karly Moura uses it to introduce blogging with Google Slides. Going a step further, Slides provides the means to give feedback during the editing stage, as well as critique of ideas  and information. Jon Corippo uses this ability to collaborate to facilitate Iron Chef lessons where different student’s form different groups and take on different roles.
  • Interactions. Going beyond the basic presentation. Slides provides a means to create interactive presentations. For some this means games. See for example Eric Curts remake of Jeopordy. In addition to this, the ability to create links provides the means to create Choose Your Own Adventure stories. Animation.
  • Publishing. Another possibility that Google Slides makes possible is desktop publishing. Whether it be creating a newsletter, a mock-up for a website or an an ebook. What makes Slides different is the ability to embed these files on the web.

ACTIVITIES:

Have a go at completing one of the following activities:

RESOURCES:

A Beginner’s Guide to Google Slides in the Classroom – A thorough introduction by Kathleen Morris, including how to make a presentation and the various uses.

Google Slides Cheat Sheet – An introduction by Kasey Bell covering all the key features

Tips for Anyone Making the Switch to Google Slides – Some tips and tricks from Jayne Miller to help switch, including using shortcuts and templates

Using GAFE for Interactive Stories – A presentation from Sylvia Duckworth looking at creating interactive stories using a range of applications, including Docs, Slides and Youtube

Jeopardy Game 5-Topic Template – A template created by Eric Curts for creating your own game of Jeopardy

Way More Than a Slide Show: Creative Ways for Using Google Slides – A good introduction to Slides from Jesse Lubinsky, especially useful in regards to making interactive presentations

Slides Carnival – A collection of free templates for Google Slides

Iron Chef Style Lesson A lesson plan from Jon Corippo and Iron Ed-tech Chef a great example from Anthony Speranza and Riss Leung

Student Guide to Collaborative Google Slides – A guide for students from Alice Keeler to support students will collaborative assignments

Editing Images in Google Docs and Slides – A resource from Kasey Bell unpacking some of the intricacies associated with editing and manipulating images

Using Google Slides to Teach – A crowdsourced document collecting together a range of ideas for how to use Google Slides created by Alice Keeler

Google Slides as Newsletter Platform – A guide from Miguel Guhlin on using Google Slides to create a newsletter

Mawhera Taniwha: Google Slides and Google Drawings – A reflection from Allanah King on using slides and embedding this into a website

Create an eBook with Google Slides – The Gooru explains how to resize a Sheet to quickly create an eBook that can then be downloaded as a PDF

10 Google Slides Activities to Add Awesome to Classes – Another useful collection of ideas from Matt Miller

Creating Interactive Google Presentations and Google Slides for Student Created Storybooks – Guides to making different types of interactive presentations from Eric Curts

Website Design with Google Slides – A video from Josh Pomeroy demonstrating the potential to use Google Slides to create a mock-up for a website

Google Demo Slam: Epic Docs Animation – An amazing animation created by a group of people over three days using Google Slides

Learning Google Slides and Advanced Search Through Star Wars and Jurassic Park – Jeff Bradbury uses Slides to create animations.

How to Create an Interactive eBook with Google Slides – Rob Kamrowski provides a series of guides for using Google Slides to create an eBook.

8 interactive Google Slides activities for classroom excitement – Another collection of ideas from Mitch Miller, including a collaborative slide book and an online course.

Game Based Learning: Google Slides Coordinate Plane Battleship – Alice Keeler provides a different take on Slides, describing the possibility of creating a collaborative work space.

Presentation Zen – A joint effort between Heather Dowd and Patrick Green unpacking how to make a great presentation.

Adding and Modifying Charts in Slides – Richard Byrne provides an introduction to the new function of being able to use charts from Sheets within Slides.

Google Slides – Using templates – Baz Roberts goes over the intracies of using templates with Google Slides.

Q&A and Google Slides – Jordan Grant outlines the new question and answer function associated with presenting using Google Slides.


If you enjoy what you read here, feel free to sign up for my monthly newsletter to catch up on all things learning, edtech and storytelling.


flickr photo shared by mrkrndvs under a Creative Commons ( BY-NC-SA ) license

For as long as I have been teaching, schools have been full of mandatory meetings whose participation and engagement with goes unquestioned. This seems to have only gotten worse in recent years with the requirement to sign off on a range of requirements. I am not saying that the requirement for teachers to engage with Anaphylaxis or OHS is wrong. I just wonder why the automatic model of delivery is the age old lecture. Even worse, the reflections are often forced and lack any conviction.

Last year, as I sat through yet another Anaphalaxsis session wondering how I would do it differently. I wondered if there was a place for a platform like Kahoot or Verso for checking answers and answering ideas. Coming from the perspective of technology, I wondered why instead of watching someone else’s mock scenario whether there was a place for teachers to work together in the creation of their own example and then share it back. Not only would this provide for a deeper engagement, but it would allow for a meaningful engagement with technology.

This year, I have taken on the role as eSmart Co-ordinator. One of the requirements is to induct new staff into the process. In the past, this was another meeting for graduate teachers to attend. Having gone over all the material, I quickly realised that much of it was covered by others, including behaviour management, incident reporting and school values. So instead of going over things again, I decided to make a short video summarising everything and send it with a survey focussing on the questions:

  • What steps would you take if you saw something in class or were informed of something by a student?
  • How do you incorporate technology within your classroom?
  • Do you use technology in anyway to connect and communicate with parents?
  • What support do you feel that you require in regards to digital pedagogies?

My intention was to focus on what was important and provide teachers with an opportunity to reflect on their own practise.

It may not be heutagogy and maybe there is a place for more formal. However, there is surely a better way. As always, I would love your thoughts and opinions.


If you enjoy what you read here, feel free to sign up for my monthly newsletter to catch up on all things learning, edtech and storytelling.

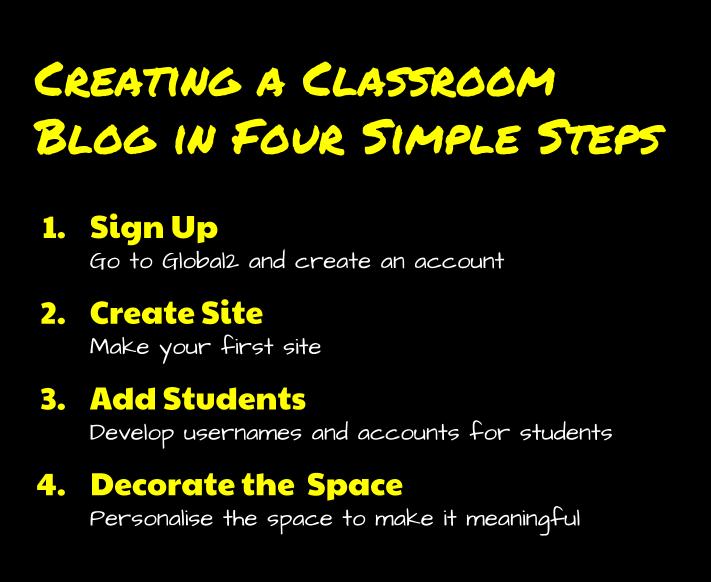
Creating a Classroom Blog in Four Steps

I have discussed the benefits of blogging with Global2, as well as some of the intricacies, including blogging with students and adding images. However, one of the obvious things that I have overlooked is how to actually sign up and start a blog. So here it is …

Sign Up

The first thing that you need to do is sign up to Global2. In addition to choosing a username, you will need to use an education-based email. If issues occur, you may need to contact the team at Edublogs to get the email domain added to the safe list.

Create a Blog

Once you have signed up, you can create a site. This can then be used as a class blog. A few things to consider is your choice of URLs. For example, for my Year 7 ICT class, I use b7ict.global2.vic.edu.au. Note, this is different to the title.

Another choice you will have to make is whether you make it open and closed. There are a range of options and it needs to be remembered that this can be changed at a later date by going to Settings > Reading. It can be good to start restricted to users only, but this has its limits.

It needs to be noted that you could create student blogs from here. However, I feel it can be best to start in the one space and use categories and custom menus to separate different voices in the one space.

Add Student Users

The next step is to add students. It is important to think about their usernames as it will need to be something they will remember. In addition to this, they will need emails. Just as with teacher blogs, these emails will need to be education-based. My solution was adding a ‘b’ at the start of each of the email usernames so as to be consistent.

Decorate the Space

The last step is adding your own touch to the space. It is like setting your room up at the start of the year. One suggestion to make things better is to activate the Edit Flow plugin. This allows for better editorial options to support students.


For my information, visit the Edublogger blog for various tips and tricks. While if you are interested in digging deeper, maybe enroll with the free course on blogging with students. See this list for different examples of educational blogs.

What about you, what has your experience been? Have I missed something? As always, comments welcome.


If you enjoy what you read here, feel free to sign up for my monthly newsletter to catch up on all things learning, edtech and storytelling.
One of the strengths of writing on the web is the possibility of presenting ideas and information in different forms. The most common form is visual images. For some this simply means going to Google and copying the first image found. However, these images are often copyrighted or have little connection with the original creator. One solution is to make your own. There are many different websites which make this possible …


Made with Recite This

RECITE This

This site allows you to quickly paste in some text and then choose from twenty different templates, ranging from a mobile phone to a notebook to a framed picture.


Made with Pinstamatic

Pinstamatic

Created to support Pinterest, this site allows you to create an image for a range of things, such as a quote, a website or an event.


Made with Quozio

Quozio

Like Recite This, Quozio allows you to create quotes from a range of templates depending on the length. You can also get a bookmarklet which allows you to create images from text straight from the web.


Made with Pinwords

Pinwords

This site allows you to add your own image or choose from some that are provided, as well as pick from a range of templates in the creation of a visual.


QuotePixel

Like many of the others, this site allows you to paste in text to create an image. Where this site differs is the ability to categorise quotes, making them more easily searchable.


Quotes Cover Bass
Made with Quotes Cover

Quotes Cover

This site provides a wider range of options than most based on colour, images and fonts. It also provides several output dimensions, including wallpapers, e-card and social media headers.


Pizap Bass
Made with Pizap

Pizap

Moving away from the quote based applications, this site allows you to create and edit images, adding filters and borders. One of the popular features is the ability to easily make memes, although Meme Generator is just as effective.


Pic Monkey Bass
Made with Pic Monkey

Pic Monkey

Similar to Pizap, this site allows you to create and edit images using a range of features, such as effects, textures and overlays. A very stylish application that is easy to use, the only limitation is that some features are premium only.


poster_from_postermywall Bass
Made with Poster My Wall

Poster My Wall

Building upon the complexity of Pizap and Pic Monkey, this site allows you to choose from a wide range of templates or simply create from scratch. It offers many variables and allows you to download the finished product for free with a watermark.


Drawings Bass
Made with Google Drawings

Google Drawings

This application allows you to create and compile your own images. In addition to matching different fonts, Drawings can be good for incorporating shapes in the development of diagrams.


Paper53 Bass
Made with Paper Fifty Three by Amy Burvall

Paper53

This iPad application allows you to make digital sketches. For more ideas on sketchnoting, see Sylvia Duckworth’s presentation. In addition to the digital, you can just draw something on paper and capture it.


Created with Canva
Created with Canva

Canva

A web application that can be used across platforms, Canva allows you to create a range of images either from scratch, by using predefined templates or remixing someone else’s work. It requires users to create an account which restricts it to 13+. There are also options for purchasing premium content, including templates and images.


Adobe Post
Made with Adobe Post

Adobe Post

In a recent addition to their suite of iOS apps, such as Voice ans Slate, Post allows you to quickly and easily make images. Where it stands out is the ability to adjust content and styles with the wizard tool. Please note, it does add a small hashtag to each make.


Picasa

A downloadable application which allows you to organise and edit your photos. Beyond the usual filters and edits, Picasa allows you create collages for your images.


Something to be mindful of is that although most of the sites and applications do not require logins, they do however keep a copy of your creations. So if you are adding your own backgrounds you need to consider this. While if you are going to use images found online then at least adjust the advanced settings in Google to search up content that has been marked Creative Commons or use sites like Photos For Class to find appropriate content.

So what about you? What images do you add to extend your writing? As always, I would love to know.


If you enjoy what you read here, feel free to sign up for my monthly newsletter to catch up on all things learning, edtech and storytelling.


flickr photo shared by mrkrndvs under a Creative Commons ( BY-NC-SA ) license

I’ve spent the last few days on Year 4 Camp at Camp Sunnystones. It was a fantastic opportunity to connect with students while completing a range of unfamiliar activities. With this, exploring what it is they care about. Having spent so long focusing on feedback and growth, it was great to explore the human element in it all. Instead of dwelling on progression points and achievement standards, the focus was on mastering the particular task at hand and how we could support each other to get it done.

Although there was some focus on the environment and sustainability, the current learning focus at the moment, many of the conversation came back to the school’s four core values:

Support

Teamwork

Achievement

Respect

Another significant opportunity that arose though was the opportunity to be a meddler in the middle. Although we may not consider ourselves as ‘sages on the stage’, the structure of curriculum, instruction and learning spaces means that there is a tendency to manage the learning more than allowing it to happen. Camp provided a space for this as there are not many teachers with a background in archery or orienteering. A particular example of leading by learning was during the hut building exercise.

The activity involved working in teams to build huts with the materials lying around. The only requirement was that everyone had to be in sight of the camp fire. This meant that the camp guide always had an eye on where groups were at. It would have been easy to spend the few hours wandering between groups, discussing how the huts were going and providing advice. Instead, we decided as a group to place ourselves in the learner’s shoes and build our own.

We started with an idea, to find three trees with forks that we could somehow connect in order to make a roof. Although we could have spent time debating which idea was best, it was important to get behind one idea early and adapt from there.

As with many ideals though, we soon had to compromise. Either the good spots had already been taken or such a space did not exist. We did find two trees which we felt offered some potential. So we found a fallen limb and put in place our first support.


flickr photo shared by mrkrndvs under a Creative Commons ( BY-SA ) license

The problem was that we could barely reach the beam and decided quickly that it just was not going to work. So we went back to looking.

We finally found a new space with a set of trees which seemed to offer some prospect. Although not ideal, we all felt it had some potential. So we all split up and set off to gather materials for our hut.


flickr photo shared by mrkrndvs under a Creative Commons ( BY-SA ) license

Beginning with two strong limbs, we proceeded to assemble our humble abode. This process involved taking different roles, sharing reflections and providing suggestions. Although we had a clear purpose, the hut was a constant negotiation, cycling through the iterative process.


flickr photo shared by mrkrndvs under a Creative Commons ( BY-SA ) license

What was interesting was the inspiration that it had on the students. Some visited to see what we were doing, others took it as a challenge to better what we were doing. One student told us that we were too noisy and weren’t very good at keeping secrets. While many adapted some of the aspects of our final pitch when they presented their huts. What was fantastic though was that, in the end, everyone benefited. That is the power of the room, or in our case, the bush.

For me, this activity represented what Jackie Gerstein describes as a model learner, where not only do educators share the process, but are open and conscious about the steps involved.  This is coupled with a willingness to fail in order to succeed. I was also reminded of the measurement for collaborative problem solving.

What about you? What experiences have you had where you have modelled the learning? Flipped the learning by leading the way? As always, I would love to know.


If you enjoy what you read here, feel free to sign up for my monthly newsletter to catch up on all things learning, edtech and storytelling.


flickr photo shared by mrkrndvs under a Creative Commons ( BY-NC-SA ) license

For so long Adobe has been known for its focus on design, but with the move into the mobile world, they have also become just as much about creativity within constraint. Dr. Tim Kitchen recently visited Brookside to support students and staff in exploring various possibilities. Some of the Adobe products that he shared were:

Presenter Video Express: Similar to Office Mix, Video Express provides the means for creating videos for flipped learning. Once you have developed a presentation and then recorded your voice over the top, you can easily toggle between the different options to focus on the text or video at various stages.

Voice and Slate: There is a reason that these two applications share the same blog. In many ways these two iPad applications are related. Whether it be the look and feel of the interface or the ability to easily source Creative Commons content from online. The difference is that Voice allows for the creation of videos (something I have discussed before), while Slate provides a means for designing a slick webpage in seconds.

Character Animator: A part of the latest release of After Effects, Character Animator shows a glimpse of the future. This new tool allows you to control animated characters with a computer webcam using your own facial expressions, voice and keyboard triggers. Animations which may have taken hours in the past can now be completed in minutes.

Shape, Sketch and Mix: This collection of mobile applications provides the means to capture, draw and edit. I particularly like the possibility of capturing physical creations and editing them to then share using something like Book Creator. Although it may seem frustrating to have multiple applications, the reality is that in splitting them up, you are better able to better utilise the limited processing power associated with mobile devices.

Pro: Pro is one of those applications that many people have on their computer, but do not necessarily know what it can do. Beyond editing, combining and locking PDF files, Pro provides the means for quickly and easily combining different files in the creation of a portfolio.

Premiere Clip: Similar to iMovie in the ability to capture and edit video. Where it differs are the various filters and settings. Another useful feature is the ability to work across devices using Creative Cloud. By making a class account, you could easily collaborate in the creation of a shared video.

Although there is always a wow factor on a day like this, with the challenge being to work out where the additions to the digital toolbox might fit within the wider context of things. Although many of the applications are free, some require a subscription. While they are all connected via the Creative Cloud and usually require an Adobe ID to use. Although not hard to do, it is just another consideration.

So what about you, how are you using digital devices to enable creativity? As always, I would love to know. Please share in the comments.


If you enjoy what you read here, feel free to sign up for my monthly newsletter to catch up on all things learning, edtech and storytelling.